Categories
< Back
Print
Blodgett Oven Door Adjustment
bytechtownadmin
Adjusting the door on a Blodgett oven is a simple procedure, but one that needs to be done properly to avoid damage. Below are step-by-step guides to instruct you on how to adjust a Blodgett oven door hinges and catch.
How to Adjust the Hinges
Step 1—Adjust the top hinge:
- First, loosen the three allen head bolts that are attached to the oven.
- NOTE: Adjustments can only be made to the hinges attached to the oven, not the door.
- Next, tap the hinges inward or outward as needed, while keeping the hinges parallel.
- Tighten the allen head bolts.
Step 2—Adjust the bottom hinges:
- Remove the weight of the door from the bottom hinge by placing a screwdriver head into the space where the two top hinges connect and pivot. Then slightly lift up the door.
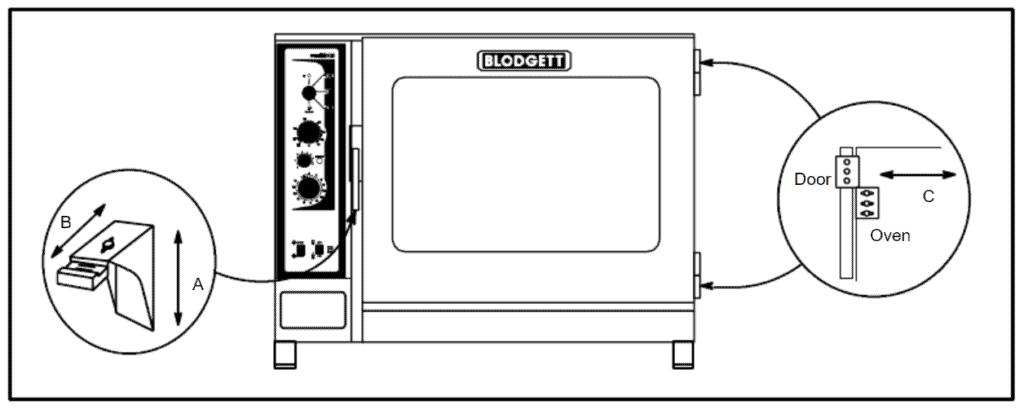
- Once the screwdriver is in place and the weight of the door has been removed, follow the same removal procedure from Step 1 (refer to Example C in the diagram below).
- When completed, remove the screwdriver.
How to Adjust the Catch
- Step 1—Open the oven door until the handle is close to the catch.
- Step 2—Loosen the two bolts on the latch attached to the face of the unit.
- Step 3—Adjust the catch from side-to-side until the head is aligned with the roller.
- Step 4—Adjust the catch upwards and downwards to ensure there is a small amount of clearance between the wheel on the door handle and the catch's tooth located on the oven (refer to the diagram below). Typically, the catch will be all the way up.
- Step 5—Tighten the two bolts holding the catch.
- Step 6—Swing the door until it's close to the catch, then with a felt tip marker, mark the catch points.
- Step 7—Adjust the top on the catch inward and outward so that it closes firmly.
- Step 8—Tighten the catch bolt.

