
Manitowoc Control Board Replacement
When replacing the control board on a Manitowoc Indigo ice machine, it's important to set it up properly for that particular model. Follow the steps below for replacing and set-up of the new control board both manually and via USB.
USB Set-Up for Control Board Replacement
Follow the instructions for a USB set-up in the event the control boards are still operational but are experiencing mechanical issues, or intermittent issues where data can be retrieved from the previous faulty control board. To complete this, you will need a flash drive in order to export the data for transfer to the new control board. Data transfer will need to be completed while the old control board is still connected to the ice machine unit.
Before proceeding with the USB set-up, make sure that the flash drive you’re using doesn’t contain built-in software. Refer to the MII-070 USB Flash Drive Specifications and Formatting.
- Step 1—Double-check that the ice machine still has power.
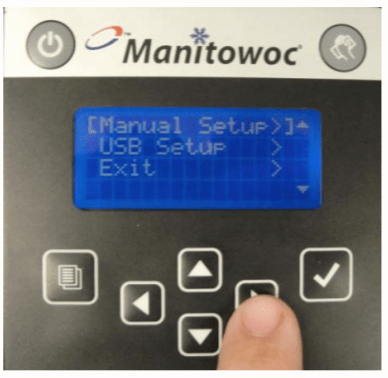
- Step 2—Press the Menu button.
- Step 3—Press the Down arrow button to highlight “Service.”
- Step 4—Press the Checkmark button to select the “Service” menu.
- Step 5—Using the Down arrow button again, scroll down until you reach and highlight “USB Setup.”
- Step 6—Press the Checkmark button again to select “USB Setup,” then “USB Stick” will become highlighted.
- Step 7—Press the Checkmark button once more to reveal a menu for USB exporting.
- NOTE—You’ll see two options for exporting data: “Export All” and “Export Setup.” “Export All” will write four files onto the flash drive, including “Asset Data,” “Operating Data,” “Real Time Data” and “Settings.” “Export Setup” will only export the “Settings” file onto the flash drive, and can be selected if you’re setting up multiple units as the same.
- Step 8—Select “Export All” and press the Checkmark button to confirm. This will prompt an instructions display to appear.
- Step 9—Follow the “Export All” instructions as follows:
- Insert Drive—Insert the USB stick into the USB port located on the control board.
- Press Check—Confirm by pressing the Checkmark button.
- Wait for Comp—Wait for 5-10 minutes for the download to finish transferring.
- Export Complete / Success—Download has finished transferring.
- Step 10—You are now able to disconnect power and replace the control board in the ice machine.
USB Set-Up After Replacing Control Board
Once the new control board has been installed, it's time to set it up. After restoring power, the screen should display the “Manual Setup” and “USB Setup” options. If the new control board has been programmed with an earlier firmware version, you'll now need to follow the steps to set it up in the “Replacement Control Board” setting under “Service Menu.” The steps are as follows:
- Step 1—Press the Menu button.
- Step 2—Use the Down arrow button to scroll to “Service.” It'll be highlighted when selected.
- Step 3—Select “Service” by pressing the Checkmark button. This will display the “Service” options.
- Step 4—Select “Replacement Control Board” using the Down arrow button to scroll through the options.
- Step 5—Press the Checkmark button while “Replacement Control Board” to confirm selection. You will then see two options: “Manual Setup” and “USB Setup.” Select the appropriate set-up method.
“USB SETUP”
- Step 1—Select the “USB Setup” option by pressing the Down arrow button to highlight it.
- Step 2—Press the Checkmark button to confirm selection.
- Step 3—You'll be presented with instructions on-screen. They'll read as follows:
- Insert Drive—First, insert the flash drive into the USB port
- Press Check—Press the Checkmark button
- Wait for Comp—Wait for the download to complete
- “Manual Setup” and “USB Setup” Display—When download is complete these options will appear
“Manual SETUP”
Use the manual set-up procedure if the control board is non-operational or in situations where asset data cannot be retrieved.
- Step 1—Select “Manual Setup” in the menu by highlighting it.
- Step 2—Press the Checkmark button to confirm selection.
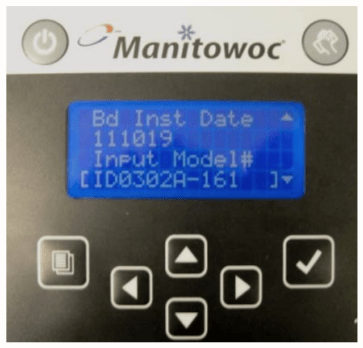
- Step 3—Check that the auto-populated date is correct.
- Step 4—If the date is incorrect, highlight the date and press the Right arrow button, which should bring up a blinking cursor on the left-hand bracket.
- Step 5—Using the Up and Down arrows to enter the correct date, and press the Right arrow button until the blinking cursor disappears.
- Step 6—If the date is correct, press the Down arrow button until the bracket is below “Input Model#.”
- Step 7—Press the Right arrow button for a blinking cursor to appear at the left-hand bracket.
- Step 8—Press the Up arrow button to make a letter “A” appear. Keep pressing the Up arrow until you get to the first letter of the Model Number, “I.”
- Step 9—Press the right arrow button to move the cursor right. Scroll up and down until you reach the next letter in the model number, then press the Right arrow button. Repeat until you’ve completely input the model number. If an error message appears, the model number was input incorrectly. Re-enter the model number.
- NOTE—Make sure you input the voltage nomenclature at the end of the model number. Check the voltage on the nameplate and add the nomenclature below (including dash).
- Step 10—Press the Right arrow button until the cursor is gone from the screen.
- Step 11—Scroll down the screen until the brackets are under “Input Serial#” and repeat Steps 7-10.
- Step 12—Scroll down the menu until you reach [Exit >] and select using the Checkmark button.
- Step 13—After a brief pause the screen will return to the [Manual Setup>] screen.
- Step 14—Disconnect the power for the control board then reconnect it to let the board reboot with the now correct model and serial number you input.
Transferring Settings to Replacement Control Board Via USB
If you're transferring settings and data from the old control board to the replacement control board, here's how to do so using a flash drive.
- Step 1—Check to see that the power to the ice machine is still on.
- Step 2—Press the Menu button.
- Step 3—Use the Down arrow button to scroll until you reach “Service.”
- Step 4—Confirm selection by pressing the Checkmark button. This will display the “Service” menu.
- Step 5—Use the Down arrow button until you reach “USB Setup.”
- Step 6—Confirm selection by pressing the Checkmark button. “USB Stick” will then be selected.
- Step 7—Confirm by pressing the Checkmark button again, thus displaying a submenu with “<Download Cnf>.”
- Step 8—Highlight “<Download Cnf>” and select using the Checkmark button.
- Step 9—Follow the on-screen instructions as stated:
- Insert Drive—First, insert the flash drive into the USB port
- Press Check—Press the Checkmark button
- Wait for Comp—Wait for the download to complete
- SUCCESS—Set-up is complete
Manual Set-Up for Control Board Replacement from Set-Up Menu
- Step 1—On the Main Menu, use the Down arrow button to scroll until you reach “Setup.” Select using the Checkmark button.
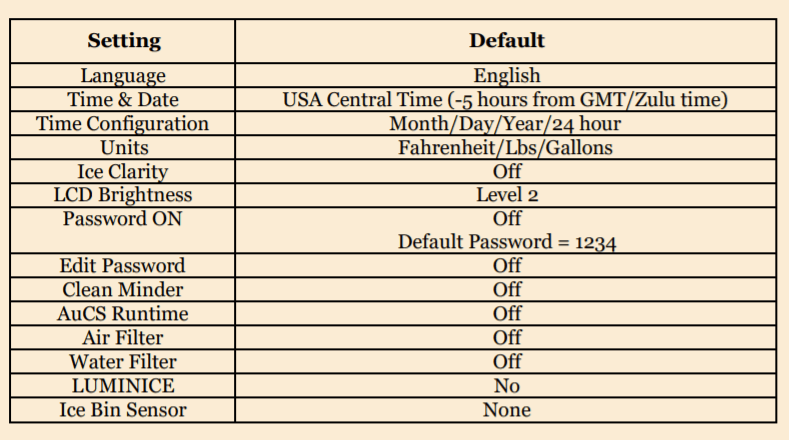
- Step 2—Customize the machine settings as needed. If needed, refer to the factory settings chart below.
- Step 3—Once finished, press the Left arrow button to return to the Main Menu.
Source: Manitowoc Indigo Control Board Replacement Instructions